Friday, December 16, 2016

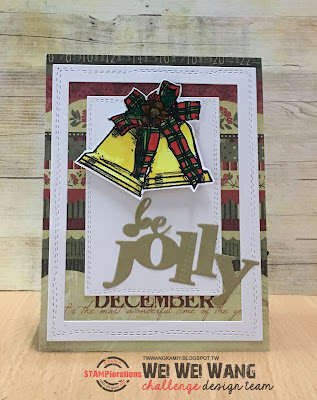
STAMPlorations Monthly Challenge #38 reminder post 手作卡片

Hello Friends! 
This is reminder post of STAMPlorations Monthly Challenge#38
STAMPlorations每月手作卡片挑戰賽。
This month our challenge theme is STAMPS & COLLAGE


Here is my DT card.


For the background, I use Christmas pattern paper and add one frame and one panel.

I stamp the bell, color it with ZIG real brush pens, and cut it out.
Then, I adhere the bell with foam tape.

To finish off, I add a die-cut word.


Hope you play along with us! 
Please visit the STAMPlorations blog to check out other talented DT's creations.
Wei Wei ----It's me.

Thank you!

CFC163 手作卡片

Hi everyone! 


Our challenge theme is CHRISTMAS & HANUKKAH

My DT card supplies:
FRI-DIES: STARS FRI-DIES


For this card, I use many sentiments from CASUAL COMFORT stamp set.
I stamp them in black ink, and add some light colors with Copic markers, so they could look like candles.

Then, I use STARS FRI-DIES, and use dry embossing technique to make impressions of the stars on the front of the card. 
For some interest, I add some stars (from STARS FRI-DIES) to the white space of the card . 


Thursday, December 15, 2016

ARTplorations Stencil Blog Hop Day2 手作卡片

I hope you enjoyed yesterday’s post.

artplorationsstencilhopdec2016.png


First, I put the stencil on kraft, apply white ink on it.
After the ink dry, I color the peony with watercolor pencils.

The sentiment is from Smile - Dee's Artsy Impressions.

To finish off, I add some pearls on the center of peony.

首先, 將塑膠板型固定在牛皮卡紙上,接著直接蓋印白色印台。
待白色印台乾了以後,使用色鉛筆上色。
字章是來自Smile - Dee's Artsy Impressions印章組。
最後,在花的中央貼一些半珠當作花蕊。


Hope you like my card! Have a nice day.


Wednesday, December 14, 2016

ARTplorations Stencil Blog Hop Day1 手作卡片

Hello there everyone! Today is the start of the ARTplorations Stencil Blog Hop


artplorationsstencilhopdec2016.png

I want to share two cards using Bloom Boldly - ARTplorations Stencil.
One stencil, Two styles.

今日分享的兩張卡片全是使用STAMPlorations Bloom Boldly - ARTplorations Stencil 的塑膠版型。 雖然是用同一的版型,但卻有不同風格。


For the first card, I put the stencil on white card base, using blending tools and distress inks to color it.

After the colors dry, I use black Zig real brush pen to draw the white space around of flowers and leaves.

Then, I die cut the hugs word on vellum, and heat emboss the sentiment in white.
I adhere the vellum to the left side of the card. 

To finish off, I add another die-cut hugs word on the vellum.

第一張卡片,首先將版型固定在卡紙上,使用海綿工具及印台推色。
拿掉版型,等顏色乾掉之後,特別用黑筆描繪花朵和葉子周圍的白邊。
接著使用hugs刀膜切割透名描圖紙,並且在同一張描圖紙上蓋印字章及燙凸。
最後,同樣使用hugs刀膜切割金色卡紙,將切割完成的hugs固定在描圖紙上,卡片即完成。


For the second, I use the same stencil, apply the same colors, but I don't add black color around the flowers and leaves.

For some interest, I add the die-cut amazing word, and heat emboss the sentiment in white.

第二張卡片,使用同一款塑膠模板,以及使用相同的上色技巧。但是這張卡片沒有特別用黑筆描邊,而是保留原本的白邊。
為了使這張卡片有趣些,使用amazing刀模,以及蓋印字章在黑紙上後燙凸。


Hope you like my cards, and join with us!

Sunday, December 11, 2016

Merry Christmas card 聖誕卡片+ 手帳生活

Hello friends! Today I would like to share this Christmas card with you.


I started by creating the watercoloring aurora background.
After colors dried, I heat embossed the Christmas tree in gold and sliver.
I also added a gold frame in front of the card.
To finish off, I stamped the sentiment in black.

首先, 用水彩畫出極光背景。
等顏色乾了以後,蓋印聖誕樹印章,並且用金粉和銀粉燙凸。
另外,我也在卡片前面加了一個金色框。
最後,在卡片中間蓋上字章,卡片即完成。 


I'm entering to the following challenges
HLS December Anything Goes with Dies Challenge
Uniko Challenge #38
ATSM Challenge #223 - Holiday

Day 8 - Twelve Days of Christmas Cards Challenge
Simon Says: Ice Inspiration
Little Tangles Challenge #75- Color Combo: Silver and Gold

MHC 魔力手作挑戰 #24 -- 照片聯想題 04 (聯想聖誕節)


-------------------------------------------------------------------------------------------------------------------
PLANNER LIFE 
手帳生活


                               除了聖誕卡片以外,還想和大家分享手帳生活~~~
之前有說過最近迷上手帳,可想而知,我這幾個月都在逛手帳的用品,手帳本、貼紙、印章、拍立得、LG相片列印機等等。掉進大坑還開心的很。
手帳我個人比較喜歡活頁式的,kikki.k、Webster's Page都有出,但價格不斐。不過我已經有活頁手帳了,所以這些品牌就先列口袋名單,待官網特價和美金跌一點的時候再買(不知何時?)

以下是我結合手帳設計和相編的成果。

This spread is my little scrapbook combined with planner.


Documenting process: 

I bought this ring-bound planner recently, so I decided to make that my format. I think it is easier to document. 
For the right page, I stamped the words (from pink paislee colors wash stamp set) in black on the right side of my page, and used the brush-stroke stamp to add some color. I also stamped the sentiment (from mama elephant).

Then, I adhered the photo, and embellished some stickers.

For the left page, i chose a pattern paper as my base. I add a kikki.k little envelope.

It ended up being an enjoyable process, which is what it’s all about !

我個人認為活頁手帳是個適合作相編的工作,因為它很容易編輯、方便收納、也可以自己作內頁(打洞器書局一支也不貴)。
右邊頁,我選擇白色作為底色,蓋印字章及井字號(印章是很久以前買的pink paislee colors wash stamp set),然後再蓋上筆觸印章。淺淺淡淡的顏色我個人蠻喜歡的。
將拍立得相片貼上之後,開始用貼紙作裝飾。並且在下面蓋上字章。

左邊頁,我用美編紙打洞後當內頁,這頁我只想要突顯美編紙的圖案,所以不特別裝飾,只夾上kikki.k素材本裡面的小信封。
以上,手帳生活即完成。


Sunday, December 4, 2016

Congrats! 手作卡片

Hello! I hope you are all well. 
Today I am sharing a card with you that is very easy to create.


Friday, December 2, 2016

STAMPlorations Monthly Challenge #38 手作聖誕卡

Hello Friends! 
STAMPlorations每月手作卡片挑戰賽。
This month our challenge theme is STAMPS & COLLAGE 


For my DT project, I take on the sketch and choose to make a Christmas card using their HOLIDAY SKETCHES: Christmas Flower and Be Jolly Phrase Die - CUTplorations.


I first color the Christmas flower (from HOLIDAY SKETCHES: Christmas Flower) using Zig real brush pens on kraft, and heat emboss in white.

Then, I cut the frame with scissors.
To match the white embossing effect, I choose white card base.

The  sentiment is from Be Jolly Phrase Die - CUTplorations.

To finish off, I adhere some pearls on the center of flower.

手作聖誕卡: 
1.首先使用Zig 筆在牛皮卡紙將聖誕紅著色後,以白色燙粉燙凸。
2.用剪刀裁出山型邊框。
3.將牛皮卡紙貼在白色卡片上。
4.用刀模切割字。
5.用半珠在花中心點綴,卡片即完成。


Hope you play along with us! 
Please visit the STAMPlorations blog to check out other talented DT's creations.
Wei Wei ----It's me.


Thank you!


Related Posts Plugin for WordPress, Blogger...