Saturday, January 30, 2021

Today - traveler's notebook layout for Elle's Studio 2021 January kit and add-on

 Hey, friends! I am here today sharing a traveler’s notebook layout using Elle's Studio beautiful January kit and add-ons.


I loved the light gray color and the blank lined pattern paper from XOXO 6 x 8.5 inch Paper Stack and decided to use it as my background. 

I really adore the January kit and I thought the pink and heart patterns 3″ x 4″ tags would work perfectly in my traveler’s notebook to document my family travel, so I used them to layer my photo and also added some of the die cuts from the January Kit under my photo and adhered them with my stapler for extra texture. 


Elle’s Studio has many gorgeous Alphabet products, so I decided to try and use a bunch of them on my page by creating a title. As you can see, My title consists of Dark Pink Puffy Alphabet Stickers, Navy Acetate Alphabet, and White Jane Tile Alphabet Cardstock Stickers. Then, I added "the best" die cut piece from January kit, and "so precious" from All My Heart Wood Veneers to complete my title.  


The light green tag is also from the January kit. I thought its color matched with my left side of the page, but there was not enough space on the right side to put the whole 3″ x 4″ journaling tag, so I trimmed it to be a tag. Then, I stamped some works from Daily Tabs Stamp. This stamp set is perfect for adding journalings in layouts,traveler's notebooks and pocket pages! 


I really wanted to add some stamping to my background, so I stamped some hearts and little words from Hugs and Kisses Stamp randomly on both pages to get more texture and bring the whole layout together. 

For the finishing touch, I added the adorable Puffy Heart Stickers and All My Heart Wood Veneers to my layout.

Just love how this traveler’s notebook layout turned out. I hope this has inspired you to use the January kit and add-ons to document your memories.  
Wei Wei

Monday, January 25, 2021

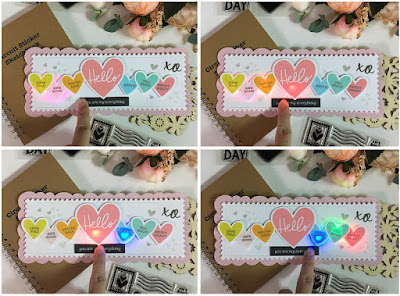
Blinking slide switch Valentine's day card

 Hi friends, today I'm up on Chibitronics blog with this blinking slide switch Valentine's day card using Chibitronics products, the stamp market stamp and Elle's Studio stamp.


Here's my circuit template:

I used a chipboard piece as the switch base. In the blinking slide switch, there is a long gap and multiple places you can press to close the circuit. To make a gap, the chipboard piece must be thinner than the 3D adhesive tape. I folded a paper piece in half and adhered it to the top of chipboard. Then, I applied the foil tape over the chipboard and connected to the battery holder. I also used foil tape to connect LED branches to the switch base. Don't forget to leave a gap. When you press your finger along the path, the LEDs will turn on in order.


I also made a process video to show how to create my LED circuit and blinking slider switch mechanism: https://youtu.be/Wf00PongAnw


That is all from my side today. I hope you were inspired and give Chibitronics products a try!Have a great day.
Thank you

Sunday, January 17, 2021

Love You - traveler's notebook layout for Elle's Studio 2021 January kit and add-on

Hey, friends! Today I would like to share this traveler’s notebook layout using beautiful Elle’s Studio January kit, add-ons and cut files.


For my title, I used ES cut files with Silhouette die-cutting machine. I used the red plaid paper from XOXO 6 x 8.5 inch Paper Stack to back up “Love You”, and moved the “Love You” right slightly. I also adhered it with 3D foam tape to make it pop against the red.

Since I already have a colorful background, I decided to add doily and tissue paper behind my photo to soften my layers, and I think it makes my photo pop off and also gives a nice little touch to my layout.


I know I need more embellishments because it just looks too flat for me. So I grabbed my chipboard stickers and paper stickers. I love this sticker sheet, it matches the papers really well. I added four adorable circle stickers and the phrase chipboard stickers to both sides. I think black could balance my page and make color more even.


To finish my page, I stamped the date on the label and stuck another one behind the right page.

I also made a process video in my YT channel:


Just love how this traveler’s notebook layout turned out. I hope this have inspired you to use January kit and add-ons to document your memories.    

Supplies: Elle's Studio 2021 January kit January 2021 Cut Files Hugs and Kisses Stamp XOXO 6 x 8.5 inch Paper Stack Love You Chipboard Stickers Puffy Heart Stickers True Love Stickers

XO,

Wei Wei

Monday, January 11, 2021

Remember This - traveler's notebook layout for Elle's Studio 2021 January kit and add-on

Hey, friends! 
I am here today sharing a traveler’s notebook layout created with the amazing January kit and add-on, using the Chipboard Label Stickers and Acetate Hearts as my main embellishment.


I am still working away on my November album and this month’s release was perfect for a layout documenting three sweet photos of my family and the sunny day.


I like to add base and I decided to use two sheet of pattern papers from ES XOXO Paper Stack to create two stripes across my spread, because I knew I was going to document 3 photos and added many embellishments, so it’s a good idea to create a base to bring the whole layout together. I also tore and wrinkled the edge to get more texture.


These journaling cards, layered behind the photos are from the January kit. I always love using journaling cards in my layout.

Chipboard stickers and labels have always been some of my favorite embellishments, and I love using them on my layouts. On my left side of page, I used the orange Chipboard Label Sticker. It added a perfect dimension to my layout. I also stamped the sentiment from Hugs and Kisses Stamp in black as my title.


On my right side of page, I used some labels from January Labels and January 2021 Kit as my main embellishments. For more dimension, I added the white puffy alpha stickers and by adding white embellishments, it kept my layout from appearing too busy.

I also stamped some little words in gray ink. To finish my layout, I added some heart acetate pieces to balance my layout and make my two pages came together!

My supplies:

Thank you for standing by!

Related Posts Plugin for WordPress, Blogger...