Hello friends, today I’m back with a Christmas card for Chibitronics.
And the special of this card is the removable battery cover door! That means you can replace a new battery.
Here is my card:
STEP1: For this card, I prepared one white panel, one white card base,vellum, velcro tape, copper tape, three white LEDs and one effects sticker. I first cut a circle window on the white panel using MFT peek-a-boo circle windows die. And also cut a hole for the battery.
STEP2: I stamped the critters, gift and sleigh image from Lawn Fawn, colored with markers and cut them out. For the background, I applied some distress inks on the the circle from the window I cut before (STEP1). In addition, I stamped starry night image from Sweet Stamp Shop in white. To make LED light more brightly, I cut three holes and adhered vellum behind it.
STEP3: Draw the circut template on the white card base. I combined advanced circuit template with parallel. After sticked the copper tape over the templae, I sticked a effects sticker and three white LEDs. This card is showcasing twinkle effects sticker!
STEP4: How to create removable battery cover door? That is very easy to do! I choose the "gift" as my battery cover door and then adhered velcro tape to the back of gift and white panel. In this way, you can detach and attach the battery cover door easily!
Take a look at the removable battery cover door!
STEP5: To finish off, I stamped the sentiment in black and added a thread .
I also sprinkled some sliver embossing powder on the background and heat embossed it.
Then, I created the front landscape using Stitched Spring Landscape - CUTplorations. (Opps! I found the die cut's name is "spring" , but my theme is "winter" ! hahaha )
I added Kodomo Popcorn Pen to the trees and house for snow effects.White Popcorn Pen is very easy to use. After applied the pen, blasted the area with a heat gun, and it puffed out like magic.
Challenge rules:
1.Players can link up to 6 projects (1 project per blog post)
2.Projects can be anything but they must feature stamp/stamping
3.STAMPlorations product is not required
4.Prizes: $10 GC for the winner; $5 GC each to the 2 top picks
5.If there are more than 50 entries: 1 player will be randomly drawn to win product of choice (3x5 stamp set OR 2 standard size stencils OR 1 CUTplorations word/phrase die)
Hope you play along with us!
Please visit the STAMPlorations blog to check out other talented DT's creations.
Since the challenge theme is white Christmas, I decided to use white cardbase and snowflakes.
I first cut many snowflakes using FUNKY FLAKES, and then arranged them to get snowflakes looking likes wreath.
I also added some light blue dots.
To finish off, I heat embossed the sentiment (from CASUAL COMFORT) in white .
Link up your creations with our theme to be in with the chance of winning a $25.00 gift certificate to the store. If you use CAS-ual Fridays stamps or dies, you'll got the opportunity to win double the prize!
I started by creating my background with some blue watercolor.
After colors dried, I cut snowflakes using FUNKY FLAKES on the background and then used inlaid die cut technique.
I also layered some snowflakes to the snowflakes which were inlaid in the background.
Then, I heat embossed the sentiment from CASUAL COMFORT in white.
To finish, I added some pearls for embellishment.
Link up your creations with our theme to be in with the chance of winning a $25.00 gift certificate to the store. If you use CAS-ual Fridays stamps or dies, you'll got the opportunity to win double the prize!
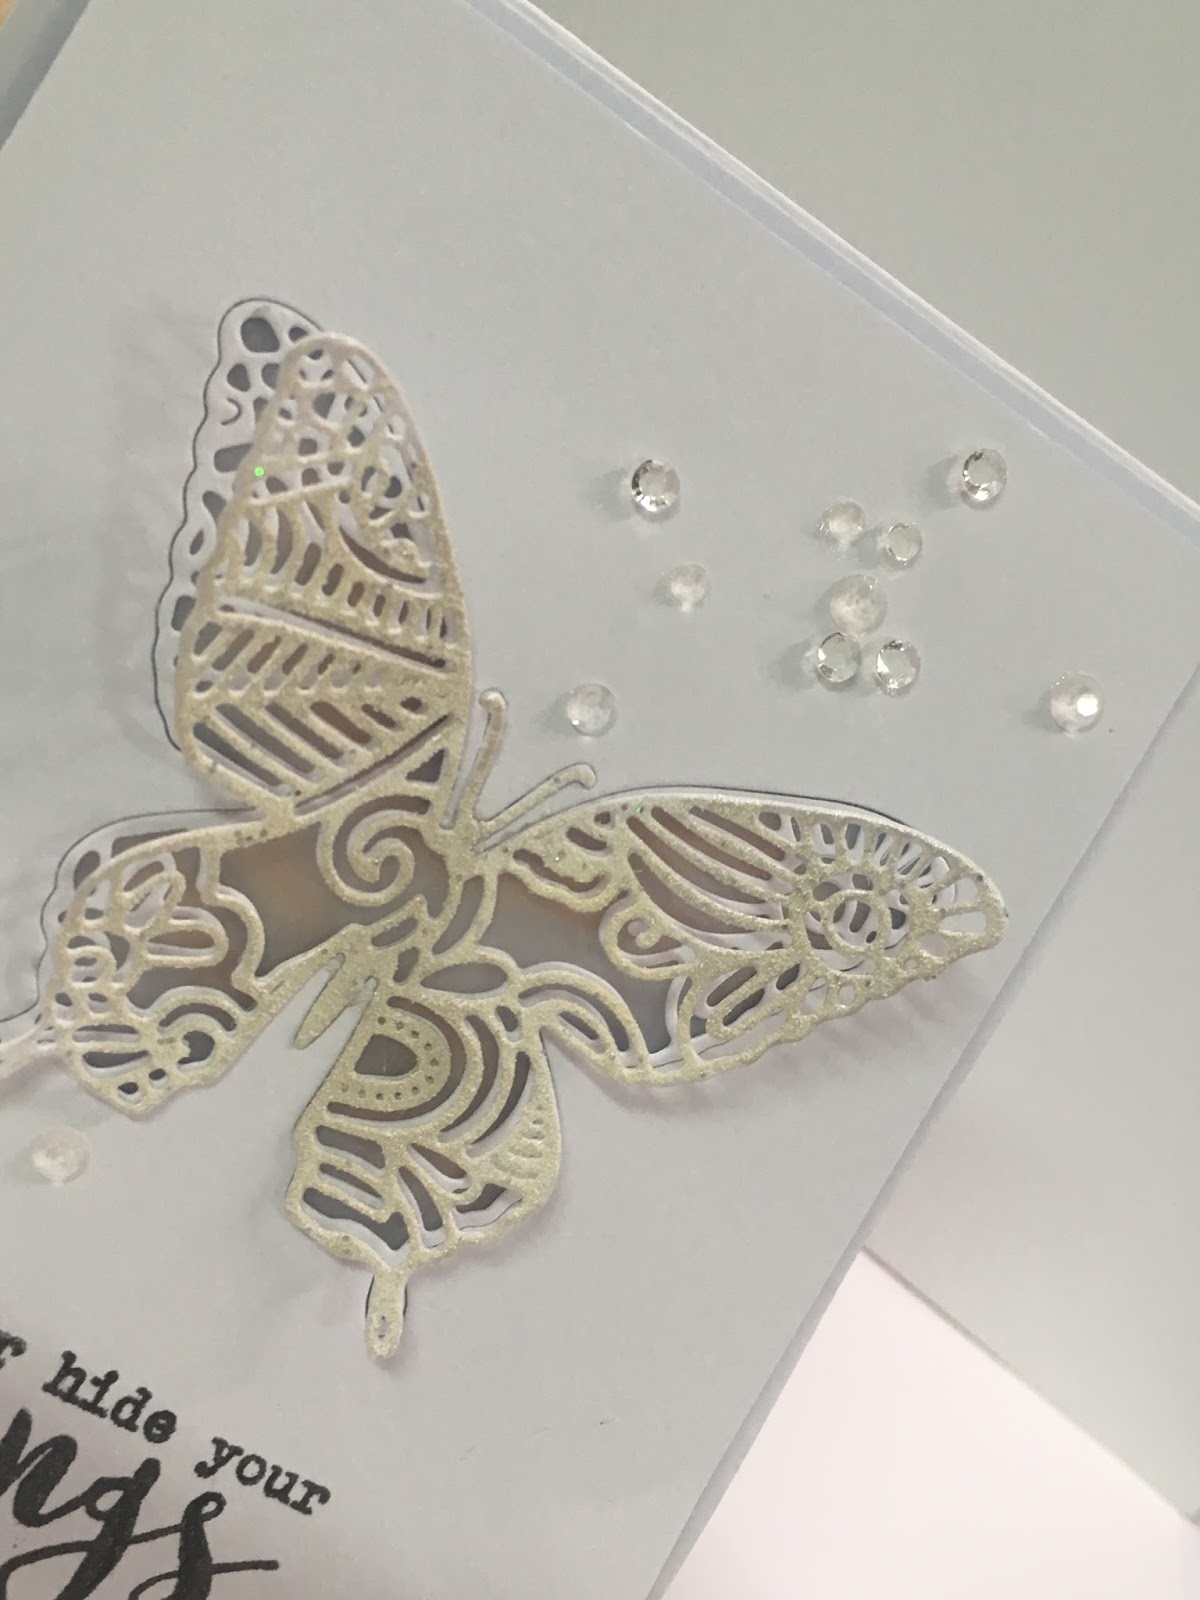
Hello! Today I'd like to share my newest light up card for Chibitronics with you!
I was inspired by easel card and decided to use Chibitronics circuit stickers on my card.
Buttery is perfect for easel card. To create my card, I prepared one 3-fold card, one cardstock, one foam with the same size as the cardstock, two butterfly die cuts, and the most importantly are copper tape, circuit stickers and effect sticker.
I started by cutting a butterfly “window” on the cardstock, adhered vellum behind the “window” ,and then inlaid the butterfly die cut into the “window”.
Next, drew a butterfly outline onto the 3-fold card.
Since I wanted to build the circuit onto the 3-fold card, I drew the circuit template in advance.
For my circuit, I combined advanced circuit template with parallel ! The advanced circuit is that putting some effects stickers into circuit to make your LEDs fade, blink, twinkle or pulse a heartbeat rhythm.
And my card is showcasing the heartbeat effect sticker.
Take a closer look at the circuit!
You can check out this page for more advanced circuit template information.
After creating the circuit, I sandwiched the foam between the cardstock and 3-folder card which has circuit on it. I also heat embossed the other butterfly die cut and adhered it onto the inlaid butterfly for some dimension.
To finish off, I stamped the sentiment in black and used some sequins and pearls for embellishment.
Here’s the step by step video or you can watch it over on my YouTube Channel:
I started by stamping the sentiments (from THANKS stamp set) in gray on the background.
Next, I cut trees using CASUAL TREES FRI-DIES, and then arranged them with a thread.
I also stamped a "thanks " in black as my theme.
To finish off, grabbed my black pen and drew a line around the edge of the card.
Link up your creations with our theme to be in with the chance of winning a $25.00 gift certificate to the store. If you use CAS-ual Fridays stamps or dies, you'll got the opportunity to win double the prize!
Since the challenge theme is "breast cancer awareness", I showcased many CALLING ALL SISTAHS- BREAST CANCER AWARENESS products, such as HOPE RIBBON stamp set, HOPE FRI-DIE and RUFFLED RIBBON.
For my background, I heat embossed FULL ON FLORAL in white and sponged some deep and soft pink on it.
Link up your creations with our theme to be in with the chance of winning a $25.00 gift certificate to the store. If you use CAS-ual Fridays stamps or dies, you'll got the opportunity to win double the prize!
I had so much fun making these cards and posts, wish you would like them !!
For my first card, I am showcasing these gorgeous flowers from Altenew. I have used it a few times now as I really love it. Definately one of my 'favorite flower' stamps at the moment.
I stamped flowers and leaves using a light pink, orange, green inks, then cut out with scissors.
For the background, I added a panel using the Altenew Dodec Cover Die.
Then, arranged those flowers and leaves together.
The sentiment also comes from Altenew. I heat embossed it in white and adhered with foam tape.